
Understanding Vapor Barrier Installation
What is a Vapor Barrier?
A vapor barrier is a impermeable material designed to inhibit the passage of moisture through walls, floors, and ceilings. Its primary function is to protect structures from water vapor, which can lead to significant problems such as mold growth, wood rot, and structural degradation. In contexts like crawl spaces and basements, vapor barriers often consist of thick plastic sheeting or specific membranes that are strategically placed to create a barrier against moisture intrusion.
Importance of Vapor Barrier Installation
The importance of Vapor Barrier Installation cannot be overstated. Proper installation effectively prevents moisture accumulation, which in turn helps maintain indoor air quality and protects the building’s structural integrity. Without a vapor barrier, moisture can seep into walls and floors, promoting mold growth and exacerbating health issues related to poor air quality, such as respiratory problems. By incorporating vapor barriers, homeowners can secure their investments and enhance comfort levels within their living spaces.
Common Materials Used
Vapor barriers can be constructed from various materials, but some are more common due to their effectiveness and durability. The most frequently used materials include:
- Polyethylene Sheeting: This type is typically available in various thicknesses and is favored for its affordability and ease of installation.
- Reinforced Vinyl: This heavyweight material offers enhanced durability and resistance to punctures, making it suitable for high-traffic areas.
- Foil or Reflective Barriers: Often used in conjunction with insulating materials, foil barriers reflect heat back into the space, further aiding in moisture control.
Preparation for Vapor Barrier Installation
Assessing Your Crawl Space or Basement
Before commencing Vapor Barrier Installation, it’s crucial to assess your crawl space or basement thoroughly. Look out for existing moisture issues such as water stains, mold, or musty odors. Additionally, evaluate the quality of insulation within the area and identify any obstructions that may interfere with installation, such as pipes, debris, or old insulation materials. Proper assessment lays the groundwork for an effective installation process.
Gathering Necessary Materials
To carry out a successful installation, it’s essential to gather all necessary materials ahead of time. This includes the chosen vapor barrier material, duct tape or adhesives for sealing, tools for cutting and installing the barrier, and safety gear like gloves and goggles. Having everything at hand will facilitate a smoother installation process, reducing the potential for delays or issues.
Safety Precautions to Consider
Safety should always be a priority during installation. Ensure adequate ventilation in the work area to avoid inhaling any dust or fumes. Wear protective clothing, including gloves and a mask, especially if working in older spaces that may contain harmful materials. Additionally, be mindful of sharp objects and uneven ground to prevent injuries.
Step-by-Step Guide to Vapor Barrier Installation
Removing Obstructions
Begin the installation process by removing any obstructions that could make it difficult to lay the vapor barrier flat. This might involve clearing debris, relocating pipes, or moving any stored items from the crawl space or basement. A clear work area will allow for better adhesion and sealing of the vapor barrier material.
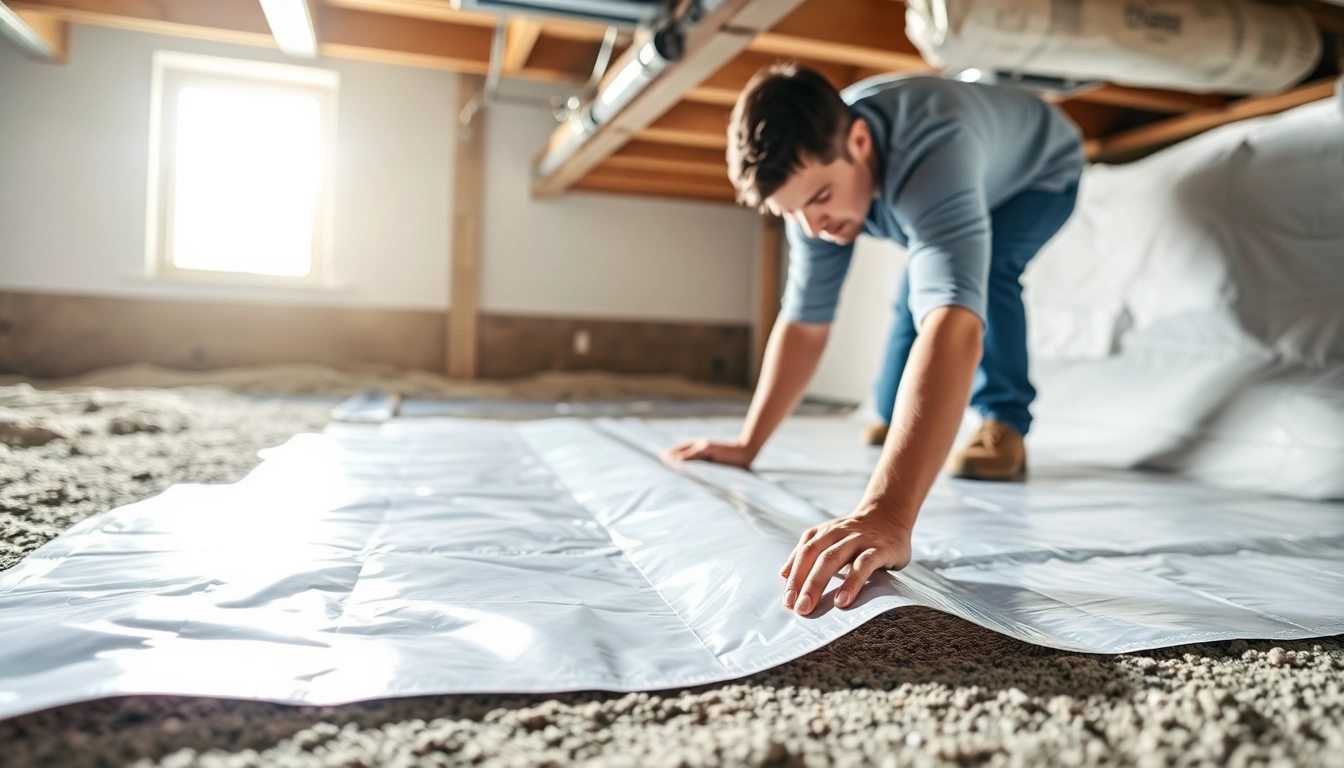
Proper Installation Techniques
Once the area is prepared, commence the installation of the vapor barrier. Lay the material out across the ground or walls, ensuring that it overlaps any seams sufficiently (typically by 12 inches) to prevent moisture from seeping through. The barrier should extend up the walls adequately, typically at least 6 inches, and must be secured using adhesive or duct tape. Following manufacturer guidelines will ensure optimal effectiveness.
Sealing and Securing the Barrier
After positioning the barrier, it is crucial to seal all seams and edges meticulously. Use compatible tape or adhesives, ensuring there are no gaps. For vertical installations, consider using fasteners or additional materials to keep the barrier secured against the wall. Proper sealing significantly enhances the vapor barrier’s ability to perform its function effectively.
Common Challenges During Vapor Barrier Installation
Dealing with Moisture Issues
One of the most common challenges during vapor barrier installation is pre-existing moisture issues. If excess moisture is present in the crawl space, it must be addressed before laying the barrier. Utilize dehumidifiers or drainage systems to mitigate moisture levels. If the problems persist, professional consultation may be necessary to evaluate underlying issues.
Addressing Airflow and Insulation Concerns
Effective vapor barrier installation also involves managing airflow and insulation. Ensure that the barrier does not block necessary ventilation systems, which could inadvertently trap moisture. If insulation is applied alongside the barrier, confirm that it is compatible and does not compromise the barrier’s effectiveness.
Correction Techniques for Mistakes
Errors during installation can lead to more significant issues later. Common mistakes include improper sealing and inaccurate positioning. If a mistake is identified, it is crucial to rectify it promptly. Re-seal any gaps using the recommended materials, and ensure that the barrier is re-secured adequately to prevent future moisture intrusion.
Maintenance and Performance of Your Vapor Barrier
Regular Inspections and Signs of Wear
Once installed, regular inspections of the vapor barrier are essential to maintain its performance. Check for signs of wear, such as tears, punctures, or lifting at the seams. These issues, if not addressed, can lead to moisture problems down the line. Conduct inspections at least twice a year, or more frequently after heavy rainfall, to ensure optimal conditions are maintained.
Improving Effectiveness Over Time
To improve the effectiveness of your vapor barrier over time, consider implementing additional moisture control methods in your crawl space or basement. This includes using dehumidifiers, fixing leaks, or improving drainage around the foundation. These measures complement the vapor barrier, creating a comprehensive strategy to combat moisture issues.
When to Consider Professional Help
While many homeowners can perform vapor barrier installation, some situations may warrant professional help. If you encounter significant moisture problems, structural damage, or complex installation conditions, it’s advisable to consult with professionals. They can offer trained insight and solutions tailored to your specific circumstances.
Frequently Asked Questions
What is a vapor barrier?
A vapor barrier is a material used in building construction to prevent moisture from passing through walls, floors, or ceilings.
Why is vapor barrier installation important?
It helps maintain indoor air quality and protects your home from moisture damage, mold growth, and structural issues.
What materials are commonly used for vapor barriers?
Typically, polyethylene sheeting and reinforced vinyl are the most effective materials used for vapor barrier installation.
How can I assess my crawl space before installation?
Look for existing moisture issues, insulation quality, and obstructions that may hinder the installation process.
When should I seek professional help for vapor barrier installation?
If you encounter significant moisture issues or structural damage, it’s best to consult a professional for assistance.
For those looking to ensure they properly navigate challenges and achieve the right results, exploring Vapor Barrier Installation resources will significantly enhance your knowledge.